hip thrust form guide
Hip Thrust Form Guide: Build Stronger Glutes Without Guesswork
A practical hip thrust form guide with clear setup cues, common mistakes, and exercise alternatives to help you train glutes with better technique.
Hip Thrust Form Guide: the simple version that actually helps
If you want a stronger glute exercise without overthinking it, this hip thrust form guide gives you the essentials. The hip thrust is a hip-extension movement that can load the glutes well, and research shows it is a useful option for building the glute muscles alongside other lower-body lifts. The key is not chasing the heaviest weight first; it is setting up the movement so your glutes do the work and your lower back stays out of the way.
Use this guide to clean up your setup, fix common mistakes, and choose smart alternatives when a full barbell hip thrust is not the best fit for your body, space, or equipment.
How to set up a hip thrust
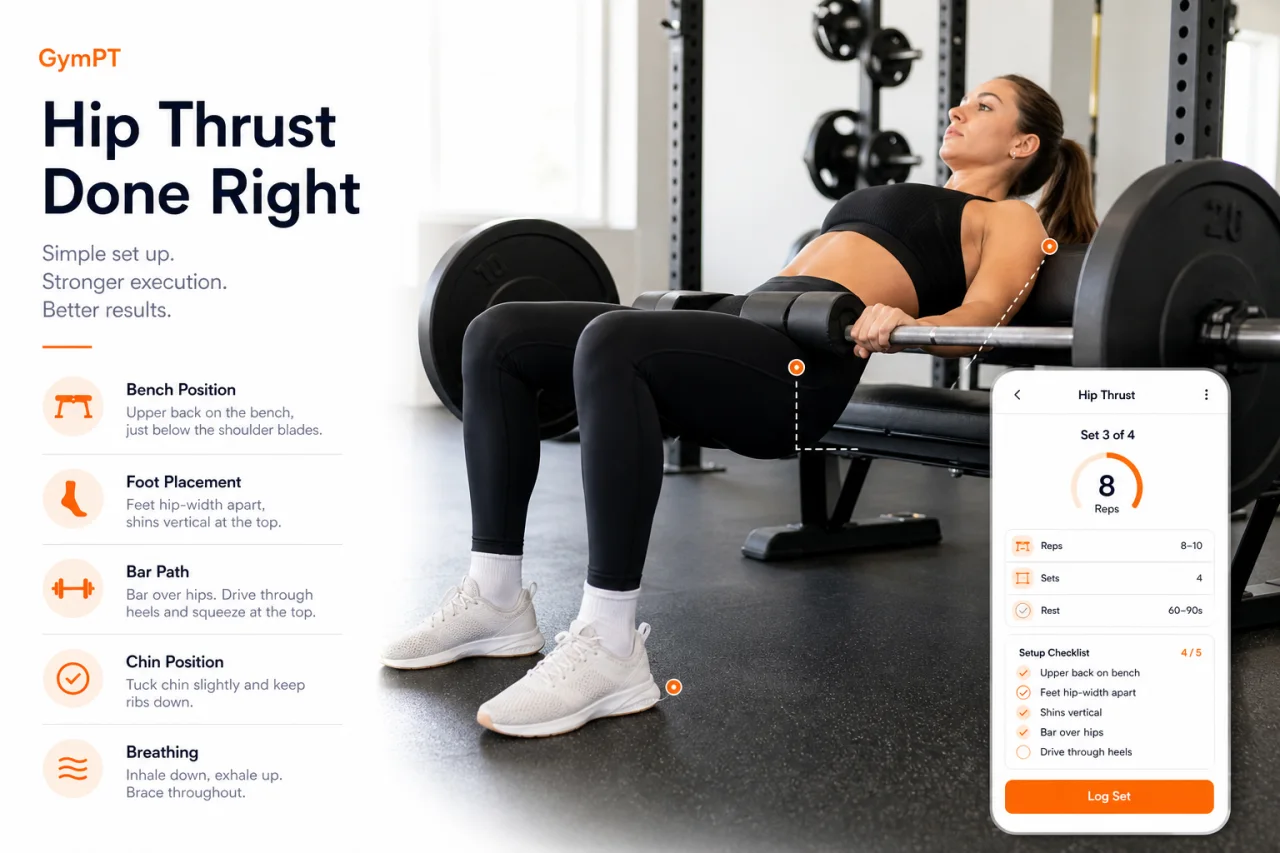
Start with your upper back supported on a bench, box, or stable surface. Place your feet flat on the floor about hip-width apart. At the top of the movement, your shins should be close to vertical, or at least close enough that you can drive through your heels without feeling like you are reaching too far forward or tucking too far under.
- Set your upper back on the bench edge.
- Plant both feet flat and brace your midsection.
- Drive through your heels and lift your hips.
- Finish with your torso roughly parallel to the floor.
- Lower under control and repeat.
A good rep feels like a strong squeeze through the glutes, not a low-back arch. If you are using a barbell, keep it centered over the hips and use padding if needed for comfort.
What good hip thrust form looks like
At the top of the rep, your ribs should stay down, your pelvis should stay controlled, and your glutes should finish the lift. Think “hips up, ribs down, chin slightly tucked” rather than “throw the hips as high as possible.” That cue helps reduce the common mistake of overextending the lower back.
Other useful cues:
- Press through the whole foot, with pressure slightly toward the heel.
- Keep the knees tracking over the toes instead of collapsing inward.
- Pause briefly at the top to feel the glutes finish the rep.
- Lower with control instead of bouncing off the floor.
Research comparing hip thrusts and glute bridges suggests both can load the glutes effectively, while the exact muscle emphasis can differ by variation. That means the best version is often the one you can perform cleanly and progress consistently.
Common hip thrust mistakes to fix first
Most hip thrust problems come from setup, not effort. If the movement feels awkward, check these issues first.
1. Feet too far away
If your feet are too far out, you may feel the hamstrings take over and lose a strong glute squeeze. Bring your feet slightly closer so you can drive through the floor more efficiently.
2. Overarching the lower back
If you finish by flaring the ribs and arching the spine, the lift may shift away from the glutes. Keep the ribs stacked and stop the rep when the hips are extended, not when the back is cranked upward.
3. Knees caving in
Letting the knees collapse inward can reduce stability. Keep light outward pressure through the feet and let the knees track in line with the toes.
4. Rushing the top position
A fast, sloppy lockout usually means less glute tension. A short pause at the top can improve control and make lighter loads more effective.
5. Using too much load too soon
Heavy weight is useful only after the pattern is solid. If your setup breaks down, reduce the load and rebuild the rep quality first.
Hip thrust vs glute bridge: which one should you use?
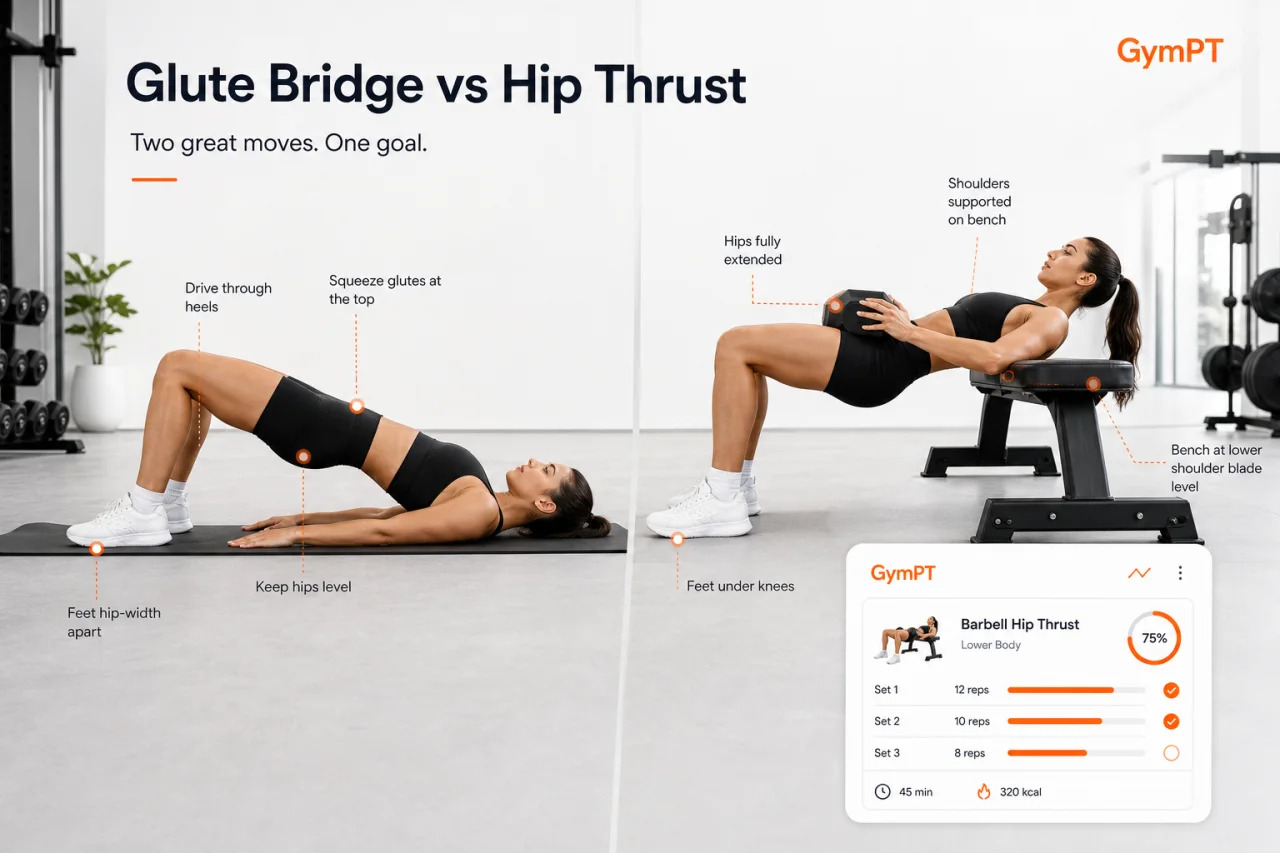
The hip thrust and glute bridge are closely related, but they are not identical. A glute bridge is performed from the floor, while a hip thrust uses a raised upper-back position. Both can train the glutes well, and research has found meaningful glute activation in both variations.
Choose the glute bridge if you want:
- a simpler setup
- less range of motion
- an easier option for beginners
- a floor-based alternative when benches are unavailable
Choose the hip thrust if you want:
- more loading potential
- a stronger top-end glute squeeze
- a bench-supported variation for progressive overload
If you are unsure, start with the glute bridge, then move to the hip thrust once you can keep your pelvis and ribs controlled throughout the rep.
Practical hip thrust alternatives
You do not need a perfect setup to train the same movement pattern. If the hip thrust is uncomfortable or your equipment is limited, use one of these alternatives.
- Glute bridge — best for beginners and floor-only training.
- Single-leg glute bridge — useful for bodyweight progression and stability work.
- Smith machine hip thrust — helpful when you want a guided bar path.
- Dumbbell hip thrust — a simple option for home or lighter gym sessions.
- Cable pull-through — a strong hinge-based alternative for glutes and hamstrings.
For a broader lower-body plan, you can also pair hip thrust work with other movements from your training split. If you want to build a smarter lower-body routine, GymPT can help you organize exercises around your available equipment and recovery.
How to program hip thrusts for better results
For most lifters, hip thrusts work well as a main glute exercise or as a secondary lower-body movement after squats, deadlifts, or split squats. A practical starting point is 2 to 4 sets of 6 to 12 controlled reps, with a brief pause at the top and enough rest to keep technique clean.
Use this simple progression model:
- Master bodyweight or light-load reps.
- Add a pause at the top.
- Increase load gradually.
- Keep the same form standard as the weight rises.
That approach is usually better than chasing max weight with sloppy reps. Consistent technique gives you a better chance to train the glutes hard while keeping the movement repeatable.
When to stop and adjust
Stop the set and reset if you notice sharp discomfort, loss of control, or a strong shift into the lower back. Mild muscle fatigue is normal; pain is not something to push through. If a variation does not feel right, switch to a simpler option and rebuild from there.
GymPT can help you track which version you used, how it felt, and whether your form improves over time. That makes it easier to progress without guessing.
Quick hip thrust checklist
- Feet flat and stable
- Shins close to vertical at the top
- Ribs down, core braced
- Glutes finish the rep
- No excessive low-back arch
- Controlled lowering phase
If you can check those boxes, your hip thrusts are probably doing what they should: training the glutes with good tension and solid control.
Bottom line: the best hip thrust is the one you can set up well, repeat consistently, and progress over time. Start simple, keep the cues tight, and use alternatives when they help you train better.
Want a personalized lower-body plan built around your equipment and goals? GymPT can turn this movement into part of a complete program.